Adobe Photoshop is the de-facto industry standard raster graphics editing software application. It is so synonymous with image alteration that “to Photoshop” or “that picture has been “Photoshopped” are commonly used terms. Photoshop can edit and compose raster images in multiple layers and supports masks, alpha compositing and several color models including RGB, CMYK, and others. In addition to raster graphics, it has limited abilities to edit or render text, vector graphics (especially through clipping path), 3D graphics and video.
Upload your completed assignment to the Digital Media dropbox (using your CATE username and password).
Tuesday class
due 02/02
Wednesday classes
due 02/03
Thursday class
due 02/04
Class Three: Image Editing- Tonal and Color Adjustments and Adjustment layers
One-Minute Survey
Please answer a few short questions regarding why you chose to take this class. Thanks.
More Storytelling with Images
Novelist Tracy Chevalier, the author of “Girl With a Pearl Earring” has a very interesting talk about how finding the story behind painting can help us enjoy them more. We are constantly telling stories, about our friends, future and past selves, strangers. When we examine images more closely, paying attention to facial expressions, body language, colors, image elements, we can have a richer experience. Here is a link to her entire TED talk.
How can you make it easier for the viewer to find the story in your images? David Peterson, a well-known photographer offers these tips:
Isolate your subjects to create a mood
Stories can be fictional. Create a dramatic scene and remove the elements that don’t help tell the story, even if it alters the reality of the situation.
Today’s photographers work almost exclusively with digital images. They find work in advertising, fashion, wedding, documentary, newspapers and magazines, and event photography. Photographers need technical skills for configuring equipment, marketing skills, and editing skills amongst others. Editing skills include ability to process and edit digital images in a host of ways which we will examine in our exploration of Adobe Photoshop, the industry-standard tool for photo editing. In 2015, the projected growth in the field of photography as 4 percent, slower than the average of all occupations. This is certainly tied to how digital photography provides the layperson very advanced photography tools.
Watch the video demonstration of homework for class three
Upload your completed assignment to the Digital Media dropbox (using your CATE username and password).
OPTIONAL- Upload your version of the Layers demo for two extra-credit points. Name the file class3_ec.PSD. Leave ALL layers intact. EMAIL me to receive extra credit.
Tuesday class
due 02/09
Wednesday classes
due 02/10
Thursday class- Professional Development (No class 02/11)
due 02/18
Class Four: Illustrator Essentials
Exploring Illustrator
Adobe Illustrator is used for creating vector based illustrations such as logos, branding elements, and designs for both print and web. The advantage of vector graphics is that they can be scaled up or down without losing any resolution or clarity.
Brand, identity, and logo are different from each other. The word identity has many meanings from how we define ourselves to how others define and identify with us. In the business world, IDENTITY is the internal image of a business and describes how they want to be perceived by the public. Logos are a fundamental extension of that identity and brand and helps tell the STORY of the brand. A good logo adds definition to a brand and helps visually explain a brand. Many brands rely on subliminal and more direct techniques to tell the story of the brand. Work with a partner to find the story of the brand hidden within these logos.
Graphic Design Careers
Graphic Design encompasses a wide variety of occupations including Graphic Art Managers, Creative Director, Production Manager, Brand Developer, Logo Designer, Illustrator, Multimedia Developer, Visual Journalist, Interface Designer, Web Designer, and more. Salaries vary widely.The video below gives you a glimpse into a working graphic artist.
Form small groups and examine at least 5 logos at this site or this site. Choose one logo and summarize how it adheres (or doesn't) to the 5 logo design best practices.
Watch Learn Audition CC; Sections- Noise removal and audio cleanup and Audio Effects
Watch Removing Background Distractions
Right-click on this file and save to your homework folder
Edit the file you just saved to your homework folder and use the tools indicated in the instructional video to remove background noises and enhance the speech.
Click Learn Essentials tab and watch Essential Tasks; Import media, Add transitions, Add and adjust titles, Add and adjust music, Output your show
Create slide show in Premiere- 4 points
Read pp. 80 and 81 in the book for instructions on the slide show
Watch the instructional video that demonstrates creating the slide show. Stop at EXACTLY 18:05 in the movie. The rest of the movie is related to a website that you have not built yet.
Collect and place ALL your asset (Adobe and other product shots, examples of your work,, backgrounds, background music)
Start new Premiere project and save as resume.pproj into the resume folder
Select File> New Sequence> NTSC>Standard 32 KHz Change the name of the sequence to hw10, and click OK. Note the movie calls the sequence resume.Please use hw10 as the sequence name.
Select File> New Title and create an opening title that fades in from black
Select File> Import and import your video clip, backgrounds, product shots, background music files, etc.
Place opening title and your video clip on the timeline. If necessary, use the crop tool to remove the creases in the green screen (Effects Panel>Video Effects> Transform> Crop).
Reduce background noise from speech audio track in Audition
Right-click on the Audio track within Premiere Pro, and choose Edit Clip in Adobe Audition
Use the Marquee Tool to select an area of background sound in the Audio file
Use keyboard shortcut Shift + P to create a noise sample
Use keyboard shortcut G to de-select the sample
Use keyboard short Control + Shift + P to apply the noise reduction process
Save the file and return to Premiere Pro
Key out the green screen- Click and drag the Ultra Key from the Effects panel onto your video clip
Use the eyedropper to key out the green
Change the Ultra Key Setting from Default to Aggressive, adjust Matte Generation appropriately; reduce highlight and shadow settings, increase pedestal.
Review the instructional video on creating a resume. Stop the video at 15:20. All content after this refers to future steps not applicable to you yet.
Review steps 2-10 from the Start Video Resume Project (above)
Createor import an audio background mix for your resume.
Come to class with your background, background music file, any other assets (product shots, your own photography, etc.) prepared to finalize your video resume.
Tuesday class
due 04/19
Wednesday classes
due 04/20
Thursday class
due 04/28
Class Thirteen: Importing, Compositing, and Exporting Video
Finalize video post-production skills in Premiere (10 points)
Review the instructional video on creating a resume. Stop the video at 15:20. All content after this refers to future steps not applicable to you yet.
Edit your speech by cutting unnecessary parts using the Razor tool (If necessary review steps 2-10 from last week before starting here)
Stitch the cuts together using the Morph Cut video transition located in Effects> Video Transitions> Dissolve> Morph Cut
Split your screen- Watch the instructional video again, on one side and complete the steps in the video within the Secure Shell Client on the other side.
Split your screen- Watch the instructional video again (Click Watch Video Only No Quiz), on one side and complete the steps in the video within Dreamweaver on the other side.
Follow ALL the steps in the video.
Send me an email with a link to your website
Copy and Paste the URL from your website
Launch an email program create a new mail:
To: jdiamond@santarosa.edu
Subject: Your name Section Number Intro to digital Media link
Paste the link into the body of the message and click send.
Problems? Click Here to REVIEW
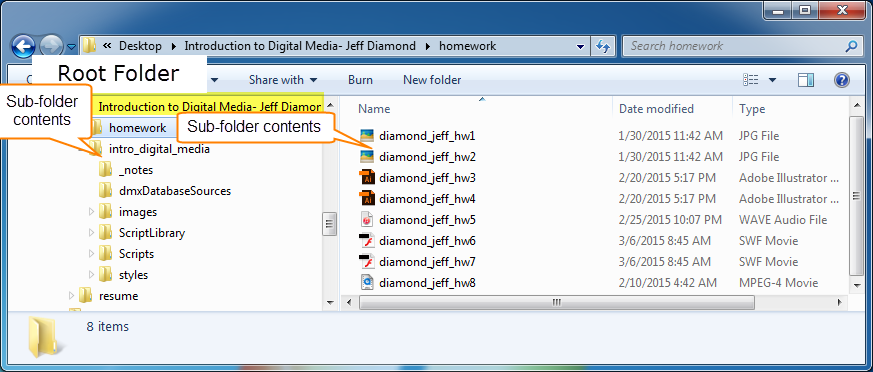
Download and Organize files
Extract the intro_digital_media folder and place it into the root folder Intro to Digital Media- Your Name that you should be working in for this class.
Your folder should look like this.
Close this window
Launch Dreamweaver-Define Your Site and Set Preferences
Export your site settings by selecting Site> Manage Sites> and click on the Export icon near the bottom left corner of the Manage Sites window
Check and upload your web pages
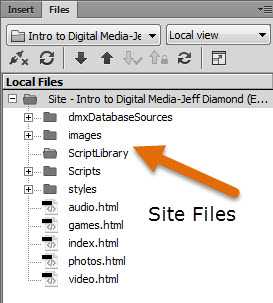
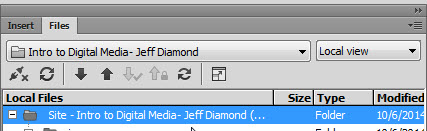
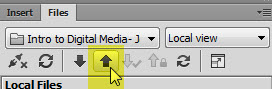
Make sure you are inside your site definition. You should see the site name at the top right of the Files panel.
It should look like the screen shot you see here.
Select site folder in the Files panel
Click on the up arrow
When asked if you are sure if you want to upload the entire site click OK.
Launch a web browser and in the address bar at the top of the browser window, type in http://student.santarosa.edu/~yourusername/intro_digital_media/index.html. Make sure that your page appears.
If you have not done so already, send an email to me at jdiamond@santarosa.edu
Subject: Your name Section Number Intro to digital Media link
Paste the link from your website into the body of the message and click send.
Tuesday class
due 05/03
Wednesday classes
due 05/04
Thursday class
due 05/05
Class Fifteen: Web Development and the Dreamweaver interface
Bringing it all together
For the remainder of the semester you will be taking all the work you have done over the course of the semester and placing it on various web pages. You have a total of 100 MB of storage space on the student server. Make sure your slide show and resume videos are LESS THAN 95 MB combined.
Modify and upload your Slide Show/Sound Cloud page (audio.html)
Open Dreamweaver and make sure you are working in your defined site (Site>Manage Sites> Import Site> You should see a folder at the top of your Files Panel on the right side of the Dreamweaver interface.
Make sure all of the files that you downloaded last week are inside of your Local folder.
Change your workspace to DESIGN
Open audio.html and complete steps in option one OR two below
OPTION ONE- Sound Cloud Page
Choose your Profile under your username and you will see the sound files you have uploaded
Click the share icon under the song you want to place on your web page
Choose Embed from the popup window
Select the code in the text filed below, right-click and choose copy
Go back to the audio.html page and choose Code View.
Click and drag your cursor through the ENTIRE iframe tag in line 50 of the Code.
Select Edit> Paste
Go back to Live View. Double-click on the placeholder text at the top of the page and write a paragraph (at least three full sentences) discussing and describing your Sound Cloud composition.
Select File> Save
Click the Preview in browser icon at the top of the page. This should upload your page to the website.
Make sure that your Sound Cloud composition plays and that all links in the navigation bar are working.
Close your page and exit Dreamweaver.
OPTION TWO- Slide Show
Choose the Code View button at the top of the Document window
Click and drag your cursor through the ENTIRE iframe tag in line 50 of the Code.
Hit the DELETE key
With the cursor in line 50 choose Insert> HTML> HTML5 Video
Look in the Video Properties below the document window, click on the Browse for file icon next to Source and navigate to the location of your mp4 file. Note: It should be labeled hw9.mp4
Click on the dropdown next to Preload and change it to auto.
Go back to Live View. Double-click on the placeholder text at the top of the page and write a paragraph (at least three full sentences) discussing and describing your Slide Show.
Select the Audio tab in the navigation bar at the top of this and ALL other pages and change the name to Slide Show
Select File> Save All
Select ALL FIVE html pages in the Files panel and click on the up arrow to put the files to the student server.
Click the Preview in browser icon at the top of the page. This will re-upload this page to the website.
Make sure that your Slide Show video plays in the web browser and that all links in the navigation bar are working.
Name the collection Intro to Digital Media Photo Album
Visible to: Public
Click Create
Click the Photos icon under Add to this collection...
Either upload the files from your computer or choose your Google Photos
Click Add button at the bottom of the set of images
Click Share
Click Name of Album link
In the URL bar at the top of the browser window copy the set of numbers after albums/ and paste it into a text file for later
Launch Dreamweaver (if it is already open, close it and re-launch it) and open photos.html
Navigate to the files here, right-click on each and save to the folder in your website called ScriptLibrary
Click on this link and save portfolio.css to your styles folder
Open photos.html
Go to line 41 and replace jdiamond57 with your Google username. Note: Replace the Google username 2 times in this line of code.
Reaplce the string of numbers after /albumid/ with your copied string from step 13 above. Note: Replace the string 2 times in this line of code.
Go into Live view and place your name where it currently says Photos by: Jeffrey Diamond
Save the page
Click the Preview In Browser icon to upload the file to the server
Anytime you need to change the content of your Web Gallery, launch a browser, navigate to your Google Photo Album and modify the contents of the album. You do not need to change your photos.html web page
Tuesday class
due 05/17
Wednesday classes
due 05/18
Thursday class
due 05/19
Finals Week: Completing your electronic portfolio
Final Exam and Projects Complete/ Opportunity for Extra Credit
Complete Final Exam -- see time and room schedule below
Day/Date
Time
Room
Tuesday, 12/15
11:00am – 2:00pm
Rm. 2920
Wednesday, 12/16
9:00am – 12:00pm
Rm. 2926
Wednesday, 12/16
12:00pm – 3:00pm
Rm. 2926
Thursday, 12/17- Petaluma
6:00pm – 9:00pm
PC 246
Check your website according to these criteria:
All links from all pages must function
Photo Gallery should function
Flash Game should function
Slide Show or Sound Cloud File should be uploaded and functional